
What is a Mentor?
With Lincoln Learning, mentors can be created and associated with a student or multiple students in Pulse. A mentor can use Pulse to run reports, progress monitor, and support only the student(s) with whom they are associated. A mentor could be a teacher, a teacher's assistant, an administrator, or a parent/guardian. There can be more than one mentor associated to a student.
The steps that allow mentors to observe their students are:
Pulse also offers the option to create a mentor and associate it to a student in one step.
Creating a Mentor
TIP: Click here for written directions.
Click the Play button below to view Creating a Mentor User video.
Run Time: 03:21
Navigate to Users in Explorer.

Click Create User. Then, select Mentor from the drop-down menu.

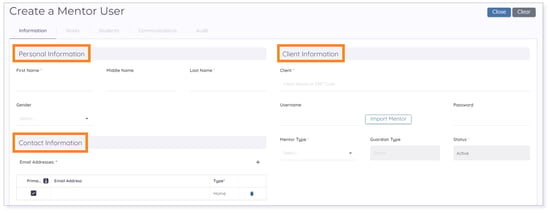
The Create a Mentor User form displays. There are three primary sections on the form: Personal Information, Client Information, and Contact Information. Some of the fields in these sections require manual input of data and others auto-populate.
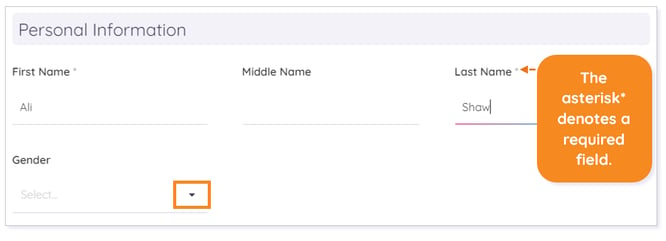
TIP: The asterisk * next to a field title denotes required information.
NOTE: For clients with a single sign-on configuration, the additional Identity Provider field will be present on the user record.
In the Personal Information field, enter the mentor’s First Name and Last Name. Optionally, enter a Middle Name (or initial) and assign a Gender by clicking on the drop-down arrow and selecting a gender option from the list.
In the Contact Information field, enter Email Address(es) and Phone Number(s). Click the Home field for each to populate a drop-down menu of further options.
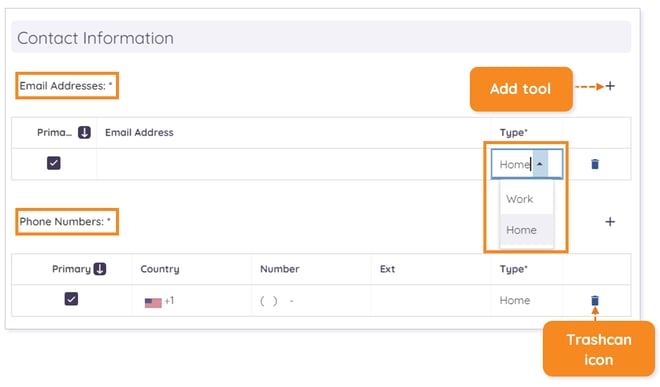
TIP: Clicking the + to the right of each field populates an add tool allowing you to add email addresses and phone numbers. If you enter more than one email address or phone number, you will have the option to reassign the Primary address or number by checking and unchecking the appropriate checkboxes. You can also click the trashcan icon to delete your entry.
In the Client Information field, begin to type a Client Name (ERP Code is not required). Then, select the appropriate client from the list.
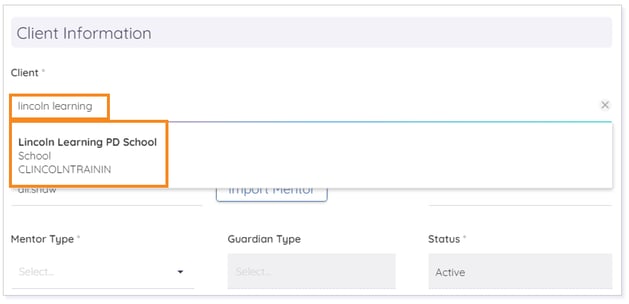
Additional LMS fields populate based on the chosen client.
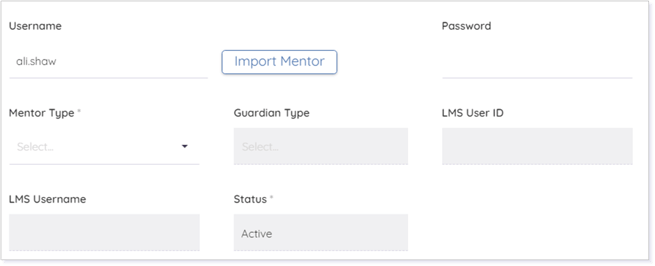
IMPORTANT: Username auto-populates based upon Personal Information entered upon mentor creation. Additionally, Status defaults to Active.
Click the drop-down arrow to select a Mentor Type.
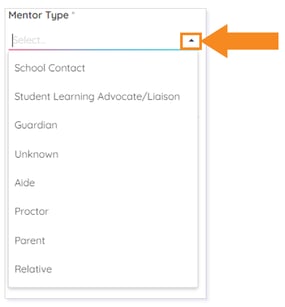
IMPORTANT: Selecting School Contact, Student Learning Advocate/Liaison, Aid, or Proctor will automatically give the mentor Client Mentor permissions. Selecting Guardian, Unknown, Aide, Proctor, Parent, or Relative will automatically give the user Mentor permissions.
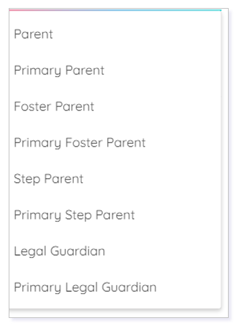
If Guardian is selected, you may select a Guardian Type from the drop-down list.
At the top of the page, click Save, Save & New, or Save & Close to save all changes and create the mentor user. Or, click Clear to clear all fields and start over.

Associating a Mentor to a Student
After a mentor is created, he or she will need to be associated to a student in order to be able to see the student's information including course progress.
There are three options when associating a mentor to a student.
This video highlights all the ways a mentor can be associated with a student. Click the Play button below to get started.
Run Time: 06:57
Associating a Mentor to a Student from the Student Record
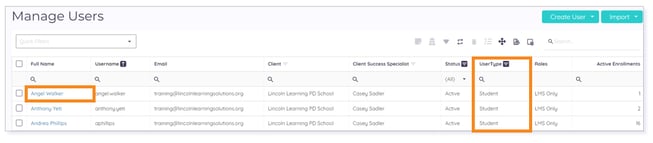
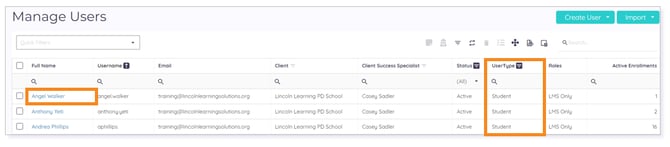
In Users, search for the student you wish to associate to a mentor.
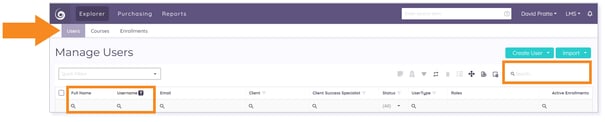
Click the Full Name hyperlink to open the student user record.
TIP: You can verify you are selecting a Student user by referencing the User Type column.
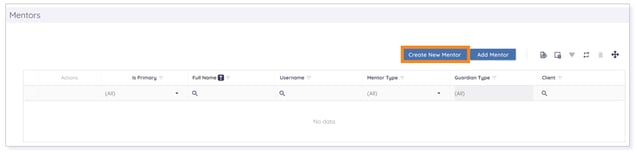
The student’s Information record displays. Click the Mentors tab.

The list of mentors associated to the student displays. Click Add Mentor.
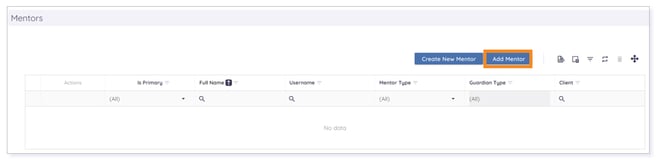
The Add Mentor form displays. Begin to type a Username, Full Name, Last Name, or Email to Search Mentors. Select the appropriate mentor from the list. Then, click Save Mentor.

IMPORTANT: Full Name and Mentor Type are required fields and are denoted with an asterisk *. Selecting a mentor from the list auto-populates these fields and assigns a default Mentor Type based upon the type assigned at the time the user was created in the system.
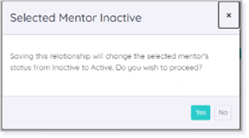
NOTE: If the chosen mentor is not previously associated and their status is set to Inactive, selecting an inactive mentor will prompt a popup notifying you that saving the relationship will change the mentor's status from Inactive to Active.
WARNING: If the chosen mentor is grayed out and Inactive, the mentor will need to be set to Active in the Mentor Record before any new association can be made.
Associating a Mentor to a Student from the Mentor Record
In Users, search for the mentor you wish to associate to a student.
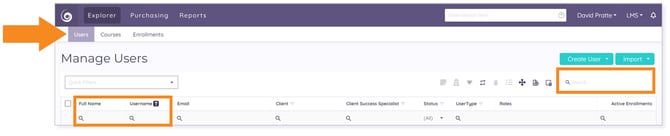
Click Full Name hyperlink to open the mentor user record.
TIP: You can verify the user is assigned the Mentor role by referencing the User Type and Roles columns.
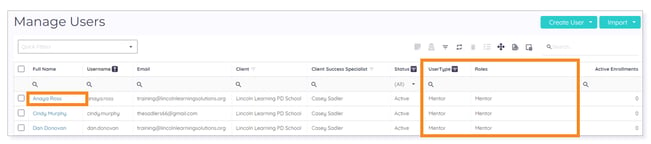
The mentor’s Information record displays. Click the Students tab.

The list of students associated to the mentor displays. Click Add Student.

IMPORTANT: Clicking Add All Students gives you the option to associate a mentor to all students for a selected client. Only choose this option if you are certain you wish to associate a mentor to an entire student roster for a specific client or for all available clients.
The Add Student form displays. Begin to type a Username, Full Name, Last Name, or Email to Search Students. Select the appropriate student from the list. Then, click Save Student.
TIP: Click the Is Primary checkbox to make the mentor primary on the student record.
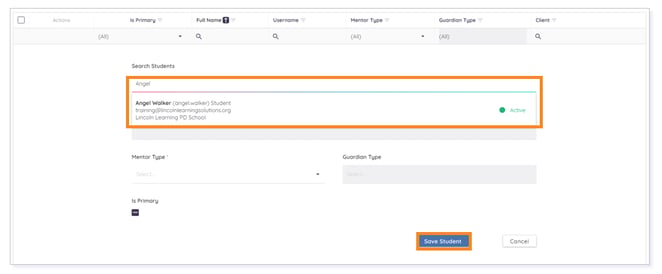
IMPORTANT: Full Name and Mentor Type are required fields and are denoted with an asterisk *. Selecting a student from the list auto-populates these fields and assigns a default Mentor Type based upon the type assigned at the time the user was created in the system.
Click Save Student to complete the association.

Associating a Mentor to All Students Within a Client
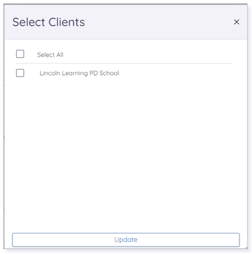
From the Students tab of the mentor's information record, click Add All Students.

A Select Clients pop-up window displays. Click the appropriate checkbox(es). Then, click Update.
IMPORTANT: Only choose the Select All option if you are certain you wish to associate the mentor to all students within all available clients.
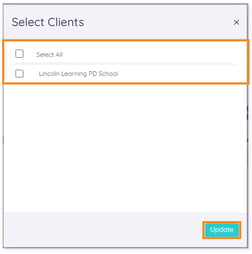
IMPORTANT: Please allow 24 hours for all students from this client to be associated to the mentor.
Creating a New Mentor User on a Student Record
In Users, search for the student to which you want to create and associate a mentor.
Click the Full Name hyperlink to open the student user record.
TIP: You can verify you are selecting a Student user by referencing the User Type column.
The student’s Information record displays. Click the Mentors tab.

The list of mentors associated to the student displays. Click Create New Mentor.
The Create a Mentor User form displays. Complete the steps to creating a new mentor.
Please note the images found in this resource may not match your screen. Access and/or features may vary based on client contract.
© 2025 Lincoln Learning Solutions. All rights reserved.