
By design, Assess Its are the graded components in your course. Your students can complete two types of assessments: an online assessment or an upload assessment.
Online and Upload Assessments
An online assessment is one the student completes in the LMS. It will contain a variety of question types including matching, ordering, multiple answer, multiple choice, passage, and/or essay. Once the student submits the online assessment, it is ready for the teacher or system to grade. Examples include Checkpoints and Mastery assessments.
An upload assessment appears only in traditional Empowered courses and not in auto-graded courses. This assessment type requires the student to complete original, authentic work and upload it to the LMS. Students can attach a variety of files and Google documents.
Adjusting Assessments in the LMS
Each LMS offers a variety of features that can modify and customize assessments. Select your LMS to see more information about Lincoln Learning Assessments in your LMS.
If you do not see your LMS listed, visit your LMS help center for assistance.
Lincoln Learning assessments are able to be published and unpublished as needed for Canvas users. Online and upload assessments are called assignments in Canvas. On the right end of each item, click the checkmark to unpublish or the circle with a line through it to publish assessments.Buzz
Buzz uses the term Assessments for online assessments and Assignments for upload assessments.
Lincoln Learning Buzz Assessments Specifics
Within a Buzz Assessment, Lincoln Learning has a few default settings.
TIP: Review the Assessment Activity tab, Assessment Settings tab, and Questions tab details from Buzz Help Center to learn more.
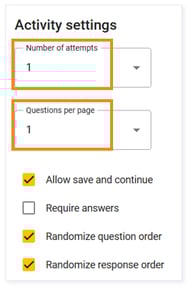
In the Activity settings tile, the following settings are typically applied for Lincoln Learning Assessments:
- Number of attempts: Lincoln Learning Solutions' default is one attempt to take the assessment. If you would like your students to have multiple attempts at completing an assessment, you can change that here.
- Questions per page: LLS default is one question per page, but if creating your own, consider how you want the students to interact with the assessments. Keeping at one question per page helps to apply focused questioning for all students.
- Randomization: These two checkboxes help to ensure students are getting a different question order with a different response order.
The Gradebook and submission tile is where you can determine the overall points of your assessment. You can also identify the score entry type or whether the activity counts as extra credit.
- Weight in category defaults to 100. Score entry defaults to Percentage.
- Lincoln Learning Solutions typically changes the Score entry to Points.
By changing Score entry to Points, you will then see a Grading scale (points) that defaults to a blank. This results in the activity being worth 100 points.
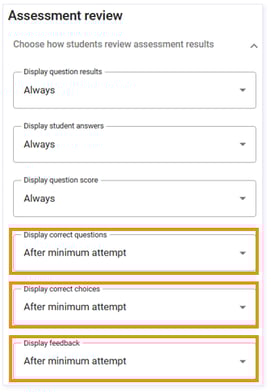
The Assessment review is where you choose how students review assessment results. By default, all options are set as Always.
Lincoln Learning Solutions typically changes the following settings in this tile while leaving the rest as default settings:
- Display correct questions should be set to After minimum attempt.
- Display correct choices should be set to After minimum attempt.
- Display feedback should be set to After minimum attempt.
Review the Assessment review details from Buzz Help Center to learn more.
Assessment pool settings tile allows you to choose how many questions and the forms of those questions you want in your assessment. You can pool the questions by groups, learning objectives, or question type.
Lincoln Learning Solutions designs online assessments comprised of question pools that create a version of the assessment based on question type and/or a number of specified questions.
TIP: If you have a modification that may ask you to eliminate essay questions, this is where you can adjust how many questions are pulled per question group. It is important to map out your changes as eliminating questions in a pool will adjust the number of overall questions and potentially adjust points. Please see the example below for additional details.
Furthermore, Lincoln Learning uses some metadata tagging that may show in a pool. Review the Question metadata tips below.
EXAMPLE: 1-pt_LLS_MC means 1-point multiple-choice questions created by Lincoln Learning Solutions.
- Point = Point per question
- LLS = Lincoln Learning Solutions-created
- CERT = Certica created
- Question Types
- MC = Multiple Choice
- MA = Multiple Answer
- MT = Matching
- O = Ordering
- E = Essay
- PE = Passage Essay
- PMC = Passage Multiple Choice
IMPORTANT: The assessment points correspond to the pool setup. If you adjust the number of questions for any type, your points will scale to the original points unless adjusted.
EXAMPLE: This assessment is worth 32 points, with eight 1-point multiple choice, one 2-point multiple answer, one 3-point multiple answer, one 3-point matching, one 4-point matching, six 1-point passage multiple choice, and two 3-point passage essay. If you eliminate one of the 3-point passage essays, the assessment will be scaled to 29 points. Therefore, if a student scores a 25 out of 29, that is equal to a 27.59 out of 32. However, if you eliminate one of the 3-point passage essays, you do have the ability to add three 1-point multiple choice questions and then the scale will stay the same.
Review the How do I use question pools? details from Buzz Help Center to learn more.
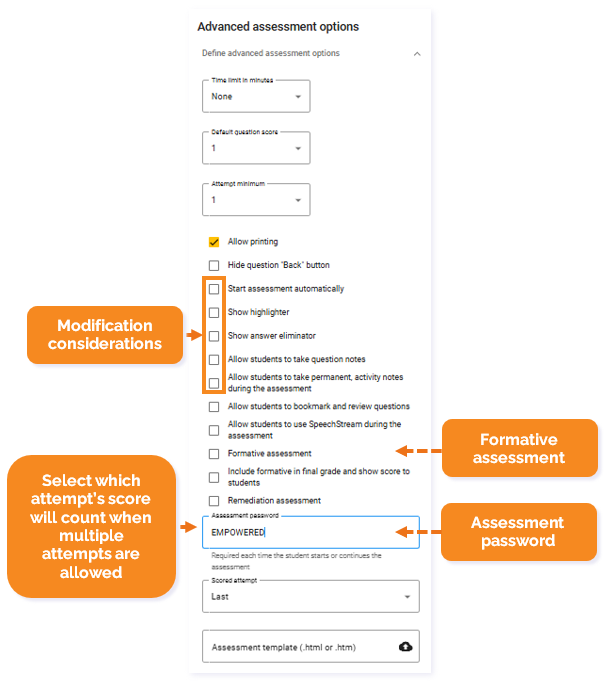
The Advanced assessment options tile allows you to add or disable features for your students’ assessments.
Here you can set a time limit, set the default question score, and set the minimum attempts you want your students to take. LLS default settings allow printing of all assessments with no time limit specified.
WARNING: Formative assessment will potentially excuse a student from previous or upcoming activities based on the standards associated. This should not be checked unless there is a specific use case.
IMPORTANT: An assessment password can be applied, but if you are doing forced progression, you may want to consider adding the password at the Visibility and access tile.
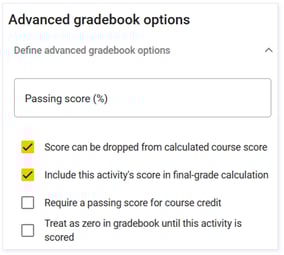
In the Advanced gradebook options, Lincoln Learning defaults to checking Score can be dropped from calculated course score and Include this activity’s score in final-grade calculation.
Additional Buzz Resources for Assessments
How do I create and use rubrics for activities and essay questions?
How do I create questions for Assessment and Practice questions activities?
What computer-based testing tools can I enable for my students?
Lincoln Learning Buzz Assignment Specifics
By design, Lincoln Learning Solutions Empowered courses will contain a variety of authentic work. These can sometimes be in the form of an upload assessment. In our auto-graded courses, you will not see these types of exams.
In kindergarten through fifth grade, you will find a hidden Assess It Answer Key. In Grades 6th – 12th, you will typically find a hidden Show It and Show It Answer Key before the upload- assessment-style Assess It. The hidden Show It Answer Key can serve as an answer key.
Show Its that are not hidden can be made into graded activities. In the Gradebook and submission tile, you can adjust the settings of the Show It to allow for uploads, points, and more. Remember to hide the Answer Key if you make these adjustments.
Additional Buzz Resources for Assignments
Click here to return to the top of the article.
Canvas
Lincoln Learning assessments can be published and unpublished as needed for Canvas users. Online and upload assessments are called assignments in Canvas. On the right end of each item, click the checkmark to unpublish or the circle with a line through it to publish assessments.

You can make some basic changes to the online assessments by opening the editing window from the Assignments page.

Teachers can also create their own online and upload assessments and incorporate them into their courses. Review the Assignments resources for more details.
Schoology
Lincoln Learning assessments can be published and unpublished as needed for Schoology users. Open the dropdown from the settings icon on the right end of the item, then select publish or unpublish.

You can make some basic changes to the online assessments by opening the editing window from the settings icon.

Teachers can also create their own online and upload assessments and incorporate them into their courses. Review the Guide to Schoology Assessments resources for more details.
Additional Schoology Resources
Click here to return to the top of the article.
Please note the images found in this resource may not match your screen. Access and/or features may vary based on client contract.
© 2025 Lincoln Learning Solutions. All rights reserve