
Teachers can use a variety of strategies to give students feedback on their upload assessments. Students may submit worksheets or other authentic work in the form of URLs or upload files. While the following steps give digital solutions to providing feedback, pencil to paper is always an option and can be captured through scanning or taking a picture and uploading it to your student.
Disclaimer: Lincoln Learning Solutions is not affiliated with, nor does it endorse, any particular app, website, or plug-in.
Feedback Types
Word Processor
You may receive submissions through various Word Processor files such as Google Docs, Microsofit Word, etc. Here are a few ideas for feedback.
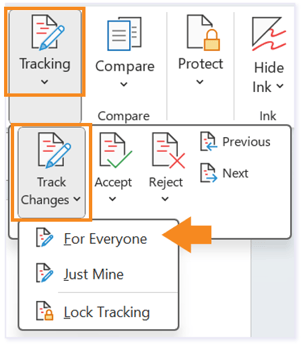
Track Changes
In Microsoft Word, Track Changes lets you provide clear, visible feedback on student work without altering their original writing. When you turn it on, any edits you make—such as insertions, deletions, or formatting adjustments—are highlighted for the student to review.
NOTE: For more details, click the link to review the Microsoft article.
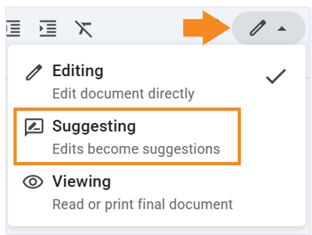
In Google Docs, Suggestions let you make edits that your students can review and approve. To turn them on, open a document and switch the editing mode (top-right corner) from Editing to Suggesting. Now, anything you type, delete, or format will appear as a suggestion in green. Students can accept or reject each change with a single click. You can also leave comments in the margin to give context or guidance. Suggestions make feedback transparent and keep the student’s original work intact while supporting collaborative revision.
NOTE: For more details, click the link to review the Google article.
TIP: For other Word Processors, review their Help features for guidance.
Comments
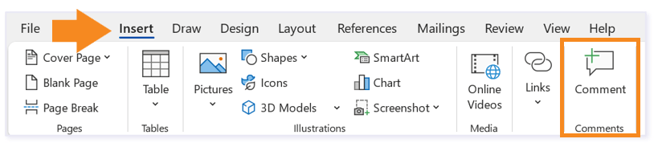
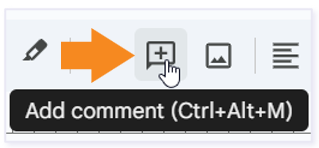
For Microsoft Word, you can also add Comments in the margin to give guidance or ask questions. This feature helps streamline revisions, makes expectations transparent, and supports meaningful, collaborative editing.
NOTE: Visit the Using Modern comments in Word article for more details.
For Google Docs, you can also leave comments in the margin to give context or guidance. Comments make feedback transparent and keep the student’s original work intact while supporting collaborative revision.
NOTE: Visit the Add Comments article for more details.
Note: Your experience may vary depending on whether you're working in a shared online document or a downloaded file that must be saved and reuploaded.
Interactive Worksheets
Depending on each teacher’s computer tools and skills, you may want to use drawing tools, screen shots or captures, audio, or video to leave your feedback.
Accessing different tools will be dependent on your LMS. Click on the links to jump to that section.
NOTE: If you opened the link in the same tab, use the browser back button to return to the Needs grading page in Buzz.
Draw on PDF
You can use the pdf draw tools to write on the worksheet by clicking the draw button at the top center of the pdf. Then, choose the size and color of your tool in the right side panel.
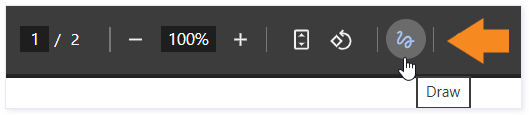
Once you have added your feedback, you can screenshot a section or download the entire document to add to your grading response.
Screenshots
Screenshots are a helpful way to highlight specific areas of a submission when providing feedback. They allow you to isolate only the portion you want to address, making your comments more precise and easier for others to understand. Below are several ways you can capture, edit, and share screenshots using common tools.
Capturing a Screenshot
Most devices allow for quick screenshot functionality:
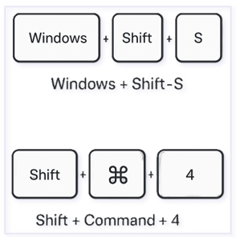
- Windows: Press Windows + Shift + S to open the Snipping Tool and select the area you want to capture.
- Mac: Press Shift + Command + 4 to drag and select the portion of the screen you’d like to screenshot.
After capturing the image, it will be copied to your clipboard or saved to your device depending on your settings.
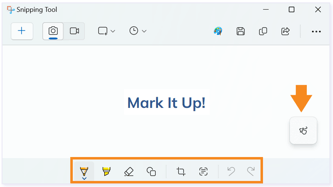
Editing or Annotating Your Screenshot
If you need to highlight, circle, or point out a specific item, you can use built‑in tools or simple applications:
-
Snipping Tool (Windows): Add highlights, draw shapes, or annotate directly.
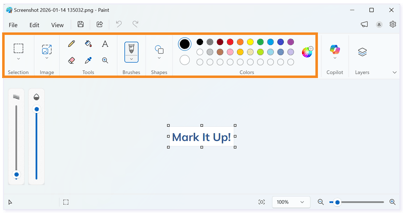
- Paint (Windows): Paste the screenshot and add quick callouts or simple edits.
- Word: Open a blank document and paste your screenshot. Word’s "Picture Format" tools allow cropping, drawing, and adding arrows or text boxes.

- Preview (Mac): Use markup tools to add text, arrows, or shapes.
Once you have created your feedback, you can copy and paste these screenshots into the assignment's provided space. Using these tools helps you focus the viewer’s attention on the exact part of the submission you are referencing.
LMS Features
Different LMSs offer a variety of tools to communute feedback to students. Click on the links to jump to the section showcasing the LMS you are working in.
Buzz
Attach file
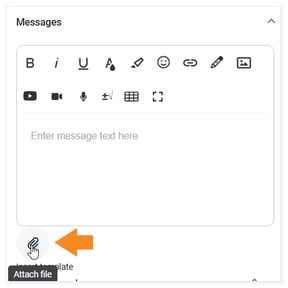
If you have many corrections on the worksheet, then it is best to download the document and attach it to the Message in the grading space.
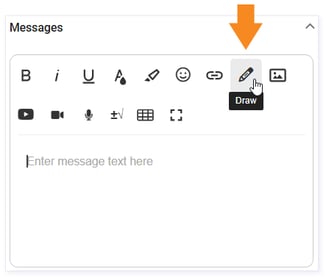
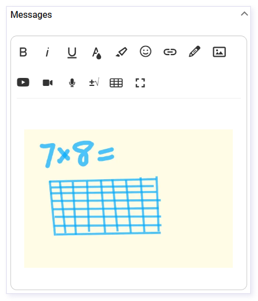
Draw in Messages
Another option is to draw in the Messages box of the grading page.
A window will open where you can find the tools on the left with a drawing board in the center. Then click Save changes in the top right.
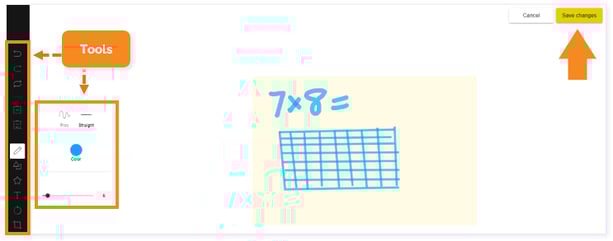
The drawing will appear in the Messages box of the grading page.
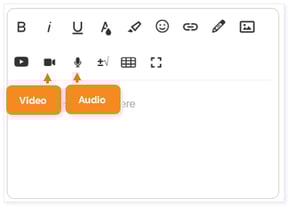
Video/Audio
Within the Buzz grading system, there is a video and audio tool to give feedback. This is a great option when you may have a lengthy amount of information to share.
Additional Buzz Resources
-
How do I send feedback Messages to a student about an activity?
- How do I create audio/video feedback for students?
Canvas
Assignment Comments
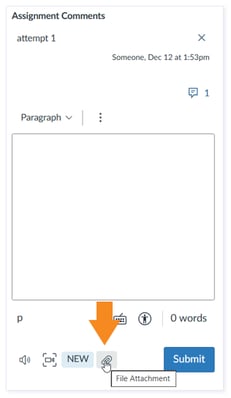
If you have many corrections on the worksheet, then it is best to download the document and attach it to the Assignment Comments in the grading space.
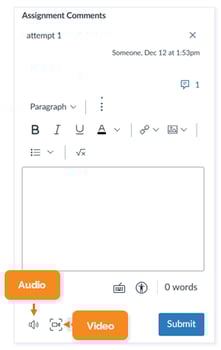
Audio/Video
Within the Buzz grading system, there is a video and audio tool to give feedback. This is a great option when you may have a lengthy amount of information to share.
Screen Capture
Another options is, selecting Screen Capture and then Enabled to record actions on your screen. This option is helpful when you want to show students how to complete a task.
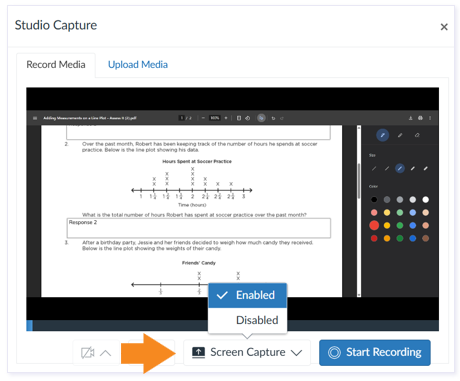
NOTE: Use the toggle to activate/deactivate audio while creating a screen capture.
![]()
Once Enabled, choose which screen you want to capture and click start recording. Migrate to the correct screen. Select Stop Sharing at the top of the screen when complete.
Give the video a title and click Save Media.

Additional Canvas Resources
Please note, the images that may be found in this resource may not match your screen.
This is a Lincoln Learning Solutions product. Access/features may vary based on client contract.
© 2026 Lincoln Learning Solutions. All rights reserved