
Upload Assessments
Upload assessments refer to any assignment, project, or assessment where you complete authentic, original work and upload it to the learning management systems (LMS). There are a variety of files types you can use to complete an upload assessment.
Scroll through this presentation to see Tips for Submitting Assessments based upon file types.
TIP: Review Submitting Upload Assessments to see the LMS-specific steps for submitting your upload assessment after you have prepared your materials.
Types of Upload Files
An upload assessment may be a worksheet you are asked to complete or an assignment in which you create your own file to upload. Depending on the assessment you're taking, the file you'll need to upload could be a document (Microsoft Word, Excel, or PowerPoint; Google Doc, Sheet, or Slides; PDF), an image, or a zip file. Below is information to help you with the different file types.
Documents
TIP: Reviewing Using Worksheetzone with Lincoln Learning, Using PDF Worksheets within Activities, and Converting Documents will be helpful to ensuring your documents are properly prepared for submission.
When saving a document, give it an appropriate name relating to the assignment. Include relevant pieces of information, such as your last name and the lesson number or assignment name. This will make it easy for you to organize and find your work and easy for your teacher to know whose work they are assessing.
If the document requires permission to be accessed, ensure you've granted your teacher access before submitting the file.
Images
When taking a picture of your project or worksheet, consider the following:
- Ensure the picture is in focus
- Lay the worksheet flat on a desk or table
- Include only the work and eliminate anything distracting
- Save image as a .jpg, .gif, or .png
Just like a document, save your image file with an appropriate name relating to the assignment.
Audio Files
Use an online voice recorder such as online-voice-recorder.com to create your audio file.
Connect a computer microphone/headset to the microphone jack or USB port that is either on the side or on the back of your computer.
IMPORTANT: Most computers have an internal microphone, so a microphone/headset is not necessary.
Click the microphone button to start recording.

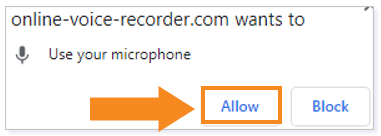
NOTE: You will need to give Online Voice Recorder permission to use your microphone the first time you use the site. To do this, click Allow.
If necessary, you can click the pause button to pause the recording.

Click the stop button when you have finished recording.

You will then get a screen where you can preview your voice recording. Click the play button to hear your recording.

If necessary, you can trim the beginning and end of the audio to remove any extra dead space.

When you are finished, click Save.

The MP3 file will be downloaded to your device.
TIP: Rename the file using the lesson number or the title of the lesson.
NOTE: If you are using a Chromebook, you can save directly to your Google Drive by changing the Downloads option in your Chromebook settings.
Right click on the MP3 file name, click Send to, and choose Compressed (zipped) folder.

Then, choose the Compressed (zipped) folder to upload to your assignment.

IMPORTANT: MP3 files must be converted to a compressed zip file before submitting.
Additional Resources
How do I create audio/video submissions in Buzz?
Please note the images found in this resource may not match your screen. Access and/or features may vary based on client contract.
© 2025 Lincoln Learning Solutions. All rights reserved.