
Lincoln Learning Solutions Customer Portal
Lincoln Learning’s Customer Portal is a secure location where registered users can create, view, and reply to support tickets.
You can also click here to directly access general navigation tips for the portal.
Accessing the Customer Portal
First-Time User
The first time you access the Customer Portal, you will receive an email to register.
The email is sent from Lincoln Learning Solutions and titled Lincoln Learning Solutions: Customer Portal Registration.

IMPORTANT: When registering, your password must be at least eight characters long and include lower and uppercase letters, a number, and a symbol.
Returning User
Once you are registered, you can access the Customer Portal three ways.
1. Click Support and select Customer Portal from the Lincoln Learning Solutions’ Website.
 2. Click Go to Customer Portal while in our Help Center.
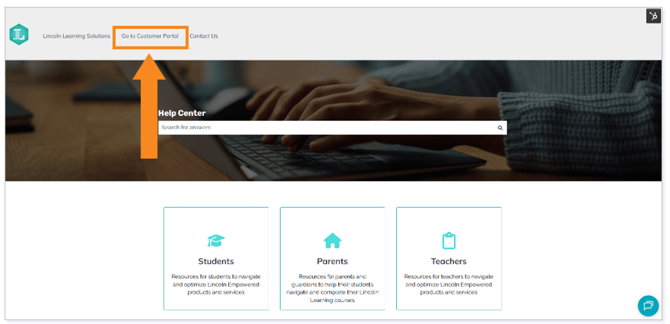
3. Go directly to the portal by going to https://help.lincolnlearningsolutions.org/tickets-view.
Creating Support Tickets
You can create the following types of tickets:
Creating Your Ticket
Begin by selecting Submit a Support Ticket in the Customer Portal.

Within the ticket creation window, type or verify your email and the School/District/Organization details. These will auto-populate after your first ticket is submitted.
IMPORTANT: If you’re submitting a ticket on behalf of another organization, make sure you type in its information.

Next, select your ticket type from the Ticket Type dropdown.

Customer Support
Our Client Success Team is here to support you. Select a Customer Support ticket if you are in need of the following:
- Reports
- Enrollment updates
- Student creation
- Training needs
- Creation and management of users and enrollments
- Course setup requests
Ticket name and Ticket description should contain as much detail as possible.
Curriculum Support
Once you select Curriculum Support, identify your Incident Type.

Report an Issue: Select for issues found within the courses. An issue means something is broken or inaccurate.
Examples of issues include, but are not limited to:
- Content errors
- Spelling errors
- Broken links
- Course Resources (pacing guides, material lists, etc.)
- Asset issues (images, PDFs, audio files, etc.)
- Wave content issues (activities, quizzes, text poppers, etc.)
- Assessment issues (Buzz, rubrics, settings, etc.)
Suggest a Recommendation: Select for ideas, suggestions, and recommendations for the curriculum team. A recommendation means something could be improved. This is not to say the recommendation is not problematic; however, it is not dire nor broken.
Examples of recommendations include, but are not limited to:
- Better clarity of content, directions, definitions, etc.
- Improvements to the content or assets
- Additional imagery
- Additional content
- Modification of an assessment due to difficulty, expectations, etc.
The Ticket name should reflect the Course Name and summary of the incident type.
IMPORTANT: Please also include additional details so you can easily identify your ticket in the Subject column. Information we recommend you include in your subject line is:
- Course Name – Lesson Number: Object Name – Issue
- Course Name – Company Associated – Lesson/Module Number: Object Name – Issue

TIP: Please include if this is an Auto-graded, Credit Recovery, State Empowered, and/or semester course.
For example:
- Science 8 – Lesson 6: Scientific Measurement – Assess It – Question 5 Correction.
- Science 8 – Focal Point – Lesson 20: Brinicle Discover Lab Assess It – No Score AW
- Aeronautics and Space Travel – Pointful Education – Intro to Space Travel – Project – Directions Not Appearing
The Ticket description should provide as much detail as possible about your issue or recommendation.

It is important to identify the issue, the location of the issue (topic, lesson, subtopic, it-type if applicable), and the exact details surrounding the issue. The more information provided, including a suggested fix, the quicker the turnaround for the fix will be.
IMPORTANT: For Curriculum tickets, it is required to specify the Product Type and to Select LMS.

Technology Support
The Ticket name should reflect the System/Area of Technical Support and a summary of the incident type.
IMPORTANT: Adding additional details allows you to easily identify your ticket from the Subject column in Tickets. Information we would recommend you include would be:
- System – Issue
- Area of Technical Support – Company Associated – Issue

For example:
- Buzz – Login Not working for John Doe
- Wave – Lincoln Learning Solutions – PDF not loading
The Ticket description should provide as much detail as possible about your issue or recommendation.

It is important to identify the issue, the location of the issue, and the exact details surrounding the issue. The more information provided, including a suggested fix, the quicker the ticket can be resolved.
Training Support
Our Training Team is here to support you. Select a Training Support ticket if you are in need of the following:
- Custom Training
- Teacher Training
- Client Training
- Family Orientation
- Professional Learning
Ticket name and Ticket description should contain as much detail as possible.
Once submitted, our team will reach out to you to schedule your initial Pre-Training Consultation to get your session on the books.
Submitting Your Ticket
By attaching a Word document(s) or screenshot(s) to your ticket, you can outline suggestions or point out specifics you may not be able to with a written description. You can locate the Attachment option below the Ticket description field.

Once all details are complete, click Submit.
Reporters will receive updates via email when their ticket status is updated.
TIP: File any emails you receive regarding a ticket you submit. You might consider creating folders within Outlook to help with organizing communications regarding a filed ticket.
Navigating the Portal
Once you’re logged in, it will take you to the homepage.

Within the portal, you can:
- Submit a Support Ticket: This option creates new tickets for Customer Support, Curriculum Support, and Technology Support.
- Search: Here you can search through your previous tickets.
- View: Sort your view between seeing your tickets or your organization’s tickets.
- Status: Sort your view by All, Open, or Closed status.
- Ticket Details: This includes your ticket ID, Subject, Created Date, Last Activity, and current status. Additionally, you can click on the Subject of your ticket to view additional details, attach additional support resources, and reply to your ticket with additional details.
When your ticket is still in Open status, you will be able to write a response, attach additional details, and view any updates on your ticket.

Please note, the images that may be found in this resource may not match your screen.
This is a Lincoln Learning Solutions product. Access/features may vary based on client contract.
© 2025 Lincoln Learning Solutions. All rights reserved.