
Personalization Options
Personalization to a course begins with the student. Understanding your students’ needs and grouping them for similar experiences is one way to personalize the learning pathway. This may be because of accommodations, modifications, or general learning needs of the student.
Several accommodations are readily available to all students based on the Lincoln Learning Solutions default curriculum framework. Frequent breaks, extended time, and/or use of a calculator or dictionary are just a few.
Lincoln Learning Solutions also incorporates Texthelp into the content. Texthelp enables students to better understand the content in their courses. It’s a feature that can read aloud the content, help students pronounce and define words, and highlight important terms to review later.
NOTE: Assessment options for Texthelp currently vary by LMS.
The additional accommodations you’re able to offer your students will depend on the capabilities of your LMS. Explore your LMS to see which of the following features are available.
One way to personalize courses is by customizing the course content to meet students' needs. Review the Customizing Course Content resource for more details.
Add content - Content options may include activities like projects, blogs, discussions, or journals with unique functionalities or adding an activity from a different course. Simpler options may include uploading your own file attachment, adding a Google Drive document, adding a website link, or adding a video.
TIP: Be aware of your course settings. If your course auto-populates due dates, adding content may adjust projected pacing.
Hide content - Your LMS may allow you to hide content based on different criteria.
TIP: Avoid hiding content students have already completed. This may cause issues with the gradebook or pacing.
Adjust Content Settings - Your LMS may allow for various adjustments to the content settings. These adjustments often affect how a student interacts with the content (the learning experience).
TIP: Adjusting these settings may be a more manageable solution than hiding and unhiding content.
Groups - Having the ability to group students within or across courses allows you to add or hide folders and activities or assign work by each group to differentiate learning.
IMPORTANT: The ability to use groups or group-like settings will vary from LMS to LMS.
Other Tools - Your LMS may have tools integrated into its functionality to support students, like math and science tools such as a calculator, protractor, or equation maker.
Color options - Visibility settings or theme colors may be adjusted in your LMS. Applying a high-contrast or dark color scheme will aid in accessibility for visually impaired students.
Personalization Options with the LMS
Each LMS offers a variety of features that can assist in personalizing the learning experience for your students. Select your LMS to see more information.
If you do not see your LMS listed, visit your LMS help center for assistance.
Buzz
Buzz has multiple features for personalizing your course.
- Why Create Groups
- Creating Groups
- Assigning Work by Groups
- Group Filtering
- Clipboard
- For Me Folder
- Using the Clipboard in a Continuous Course
Why Create Groups?
As a teacher, you may find it useful to organize students into groups. Grouping can help you organize a cooperative learning project or meet a student’s need for modifications. Taking the time to create and place students in specific Buzz-based groups is a vital first step to adjusting content and assessments for your students.
Below are a few scenarios to consider.
|
Groups By Student |
If you have separate groups for several students in your course, you may want to create a group set called “Students” and name each group within the set according to each student’s name. Make sure you assign the appropriate student to each name. This capability allows you to establish specific experiences for each student, but it is not ideal for large classes. |
|
Few Students with Modifications |
If you have only a handful of students who need specific modifications, try creating a group for each student and applying specific modifications. Again, this is not ideal for large classes. |
|
Same Modifications Across Multiple Students |
If you are creating a group to apply modifications, you might organize your modifications by creating a group set containing one group for each modification. |
|
Multiple Modifications for a Single Student |
If you have a student (or students) who requires more than one modification, try creating a group that applies all modifications instead of assigning the student to each individual modification group. This will help you avoid an overlap experience. |
The article Help late-enrolled students get oriented highlights additional usage of Groups and the Clipboard.
Creating Groups
TIP: Review the How do I create and manage groups? details to learn more.
In the Buzz directions, you will see how to create Groups through the People tool.
IMPORTANT: You must be on the People page for an individual course. This action will not work from the Main Menu People option.
You can also create groups in the Buzz Editor of the appropriate course. Select the tools icon (wrench) and select Manage groupings.

WARNING: When you are editing items in the Syllabus, the Filter by Group option shows only Group names. These items are not organized by group sets, which is why naming each group specifically is important. Name groups according to their usage or user.
Click the Play button below to view the Using Groups Part 1: Creating Groups video.
Run Time: 05:05
Assigning Work by Groups
TIP: Review the How do I configure group-specific activity settings? details to learn more.
Click the Play button below to view the Using Groups Part 2: Assigning Work by Groups video.
Run Time: 03:17
IMPORTANT: You must use the Filter by group icon to select a group from the drop-down menu before you make and save your changes. Otherwise, the changes that you make to the assessment will be applied to all students, not just the students in one group.
Group Filtering
If the Editor was used to hide activities, use Group Filtering in the Activities view to easily see what items have been hidden for each group.
Using the Activities view, select the filter by All groups icon from the top toolbar, and then choose a group from the drop-down menu.
![]()
Now you can review the activities exactly as they display for the group. Notice eye icon indicates the item has been hidden from this group of students.

With these filtering options, you will be able to focus on your specific student groups while navigating the various sections of Buzz.
Clipboard
Groups can also be used in the People and Clipboard areas of Buzz. Review the Agilix Buzz Help Center resources below to learn more.
The Buzz Clipboard can also be used for individual students, quick lists, and one-time lists within the same course or across courses.
Click the Play button below to view the Personalized Learning Clipboard video.
Run Time: 03:58
Through the Clipboard, you can assign activities, award badges, assign tasks, and send messages.
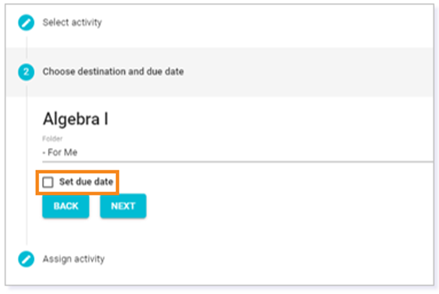
For Me Folder
TIP: Create a For Me folder as the top folder in your course prior to using the Clipboard. Do not place any work from the Editor in this folder. It will only populate if you assign work to it through the Clipboard. It will also default as the assigned folder if placed at the top of the course.
When you use the Clipboard to personalize student learning, you need to identify a location in the course to place the activity. This way, the student to whom the work was assigned will see the item in this location but other students will not. Once you assign the activity through the Clipboard, it is placed in the designated location for that student.
Students can access activities where you have placed them or by going to their Gradebook and clicking on the For Me tab. As a teacher, after you assign an activity to a student from the Clipboard, you can only access those details again by going to the Gradebook and finding the activity in the For Me tab.
Using the Clipboard in a Continuous Course
Lincoln Learning Solutions courses are set up as continuous courses. If you place a due date on an activity you assign to a student through the Clipboard, that due date is not applicable. Rather, the due date will be issued based on the folder in which you placed the activity and the start and end dates of the course.
 Additional Buzz Resources
How do I create and grade group assignments?
How do I assign activities using the Clipboard?
How do I add students to the Clipboard?
How do I create Quick lists in the Clipboard?
How do I use the Clipboard to email parents/observers?
Click here to return to the top of the article.
Canvas
In Canvas, groups can be created for students to work collaboratively. View the Groups Overview resource to learn how to create student groups. Choose the People link in the left navigation panel within a course to get started.

Alternatively, you can assign an assignment to a group in a course by following the steps in the How do I assign an assignment to a course group? resource.
In some cases, you may need to create groups of assignments for specific students who may need modifications. Creating assignment groups is one way to organize these personalized assignments. Review the How do I add an assignment group in a course? resource to learn how to create and organize assignment groups. Then, you can set rules for the assignment group by following the steps in the How do I create rules for an assignment group? resource.

WARNING: If content is moved or unpublished Assess Its are not adjusted automatically. Teachers will need to unpublished the assessment(s) associated or consider creating their own.
Additional Canvas Resources
ModulesSchoology
Creating groups in Schoology can be done depending on the grading system integrated in your account. Review the Guide to groups resource to identify your grouping options.
For modifications, creating personalized assessments can address this need by following the steps in the Guide to Schoology Assessments resource.
Teachers are able to publish and unpublish Lincoln Learning content in both Canvas and Schoology. Teachers can also adjust lesson names and order of content. Visit the Customizing Course Content article for steps to make adjustments.
WARNING: If content is moved or unpublished Assess Its are not adjusted automatically. Teachers will need to unpublished the assessment(s) associated or consider creating their own.
Additional Schoology Resources
Course Materials
Please note the images found in this resource may not match your screen. Access and/or features may vary based on client contract.
© 2025 Lincoln Learning Solutions. All rights reserved.