
Upload Assessments
Upload assessments refer to any assignment, project, or assessment where you complete authentic, original work and upload it to the learning management systems (LMS).
TIP: Prior to submitting your upload assessment, review Preparing Materials for Upload Assessments to learn helpful tips and tricks to ensure your work is successfully prepared for submission.
Uploading Assessments in the LMS
Click the name of the LMS below for tips on starting and submitting an online assessment.
If you do not see your LMS listed, visit your LMS help center for assistance.
Buzz
IMPORTANT: This video shows the upload experience for files and Google items. For written documentation for submitting Lincoln Learning Worksheets, click here.
Click the Play button to watch the video.
Run Time: 02:16
Once you have completed the assessment, click Submission or scroll past the assignment details to the Submission section.

You will have the option to either attach a file, attach a Google file, or submit a Lincoln Learning Worksheet link.
Click the plus sign on the option you prefer to attach or click in the Comments box to submit the worksheet link.

Attach a File
To choose a document saved on your computer, click + File. Next, click Choose.

Select and Open the assignment document.

Click Upload.

TIP: To add more than one document, repeat the steps above.
NOTE: You can add a mix of files (Word, PDF, images) and Google documents to the same assignment.
Choose Google Document
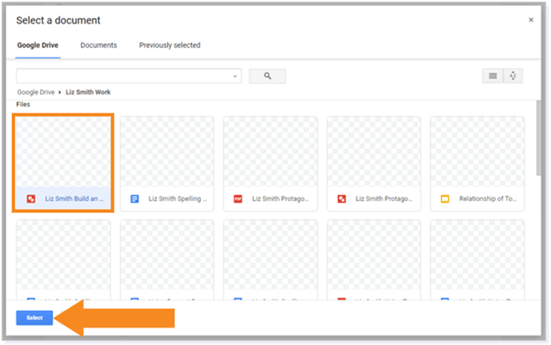
To choose a Google Document, click + Google file. Then, click Choose Google file.

Find and select the assignment document. Then, click Select.
TIP: To add more than one document, repeat the steps above.
NOTE: You can add a mix of files (Word, PDF, images) and Google documents to the same assignment.
Linking a Lincoln Learning Worksheet
After completing and saving the Lincoln Learning worksheet, a Copy Link button will generate at the top of the worksheet. Click Copy Link.

In the pop-up modal, copy the link and click OK.

Scroll to the Submission box and paste the worksheet link.

IMPORTANT: With a Lincoln Learning Worksheet, you will not be able to resubmit your work unless your teacher allows you a retry. You will then need to download a copy of the worksheet and resubmit it as an attached file.
Submitting an Upload Assessment
You will see the attached assignment below the Comments box or your linked worksheet in the Comments box. Click Submit my work to submit the assignment.

When you’ve successfully submitted the assignment, you will see Status: Completed, Submitted under the Target due date and the statement You have successfully submitted this assignment under the attachment.

Additional Buzz Resources
How do I add attachments to an Assignment activity?
Click here to return to the top of the article.
Canvas/Schoology
IMPORTANT: This video shows the upload experience for using Google Worksheets. For written documentation for submitting Lincoln Learning Worksheets, click here.
Click the Play button to watch the video.
Run Time: 02:41
Whether your LMS is Canvas or Schoology, the upload assessment experience will be the same. You may be asked to create authentic work or interact with a Lincoln Learning worksheet and upload it as a file or a worksheet link.
IMPORTANT: You have access to Texthelp by clicking SpeechStream in the Assessment Tool Menu. Read Aloud will not work in Google Drawings.
![]()
Review the Texthelp Features Overview for more information regarding Texthelp.
File Uploads and Lincoln Learning Worksheets
For an assessment requiring a file upload or the completion of a Lincoln Learning Worksheet, read the instructions and complete the assessment.

IMPORTANT: Review Interacting with Lincoln Learning Worksheets to learn how to complete a worksheet assessment. Once complete and you have a Copy Link, paste the link into a supported file format to be uploaded.
TIP: Lincoln Learning upload assessments are typically accompanied by a rubric to ensure you are meeting the activity requirements.
Return to the upload assessment in the LMS and locate the submission box.

Select Upload files.

NOTE: Supported files formats include JPG, PNG, TXT, Excel, Word, Powerpoint, GIF, PDF, ZIP, and Open Office.
Choose your upload assessment for submission and click Open.

TIP: Hold Control (Ctrl) and select more than one file if you need to upload multiple items for your submission.
Once the file is uploaded, you will have the option to upload another file, enter a file text description, or delete the file.

Submitting Your Upload Assessment
When you are ready to submit, click Finish.

Click Yes to confirm you are ready to submit.

WARNING: Upon submission, you will see an initial score of 0. Once the teacher scores your upload assessment, you will see a final score and any teacher feedback if available.
TIP: Click here to see additional information and helpful tips for submitting assessments.
Click here to return to the top of the article.
Please note the images found in this resource may not match your screen. Access and/or features may vary based on client contract.
© 2025 Lincoln Learning Solutions. All rights reserved.