This resource introduces the Buzz Editor and provides an overview of its features.
The below video explains how to use the Buzz Editor to manage and customize course content. Click the Play button to get started. Or, click the links below to navigate directly to that section.
Run Time: 04:14
OVERVIEW
In the Editor, you can move lessons to different folders, add resources and links for your students, and include additional information that will help your students complete their lessons successfully. You can access the editor from the Home page by clicking the Editor icon under the course card or clicking in the list view for the course you want to modify. You can also get to the Editor from the Main Menu by selecting the course and then clicking on the Editor icon.
When you first access the Editor, you will see a few different areas. This image shows the initial view.
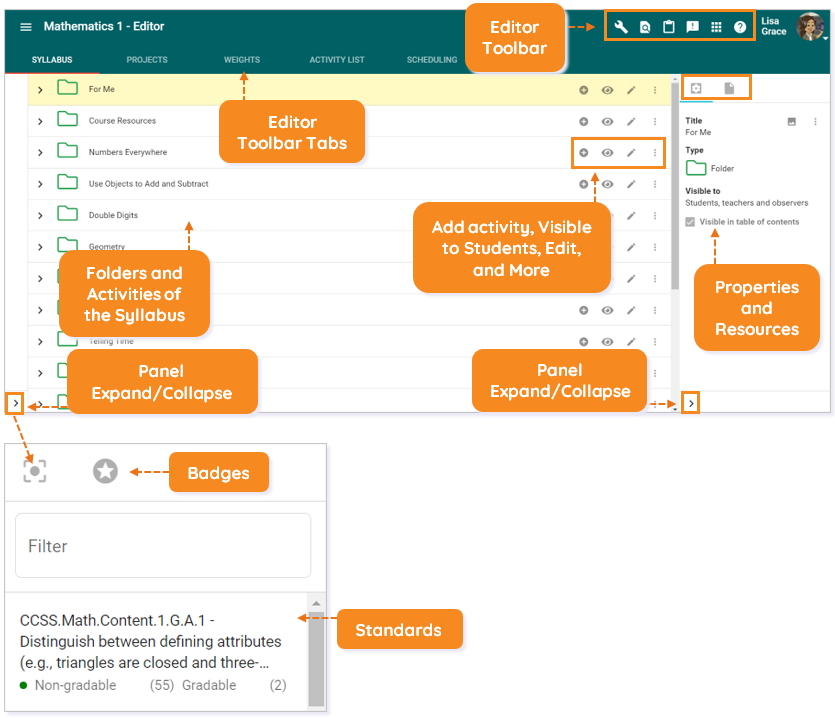
TOOLBAR
The Editor toolbar allows you to make adjustments at the course level versus at the folder/activity level.
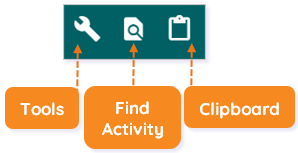
Tools: This icon allows you to control the course’s general setup, appearance, gradebook, and scoring information.
- Course settings: This option allows you to view and edit course settings. Read the Course Settings article for more information.
- Landing page: This option allows you to personalize a welcome message for the student and add an agenda item. To learn about this feature, read the Creating a Course Landing Page article.
- Course links: This option is now available in Course Settings.
- Course objectives: This option allows you to view the standards within the course. You can also add, edit, and delete these standards.
- Manage groupings: This option gives you the ability to create, edit, and delete group sets. The Creating Groups article provides step-by-step directions for creating groups.
- Recycle bin: This option allows you to review and restore deleted content.
- Find activity: This icon allows you to search for activities in your course by activity title or ID. You can directly access activities by clicking on them. The Searching for an Activity article shows you how to find activities in your course.
- Go to clipboard: This icon allows you to personalize learning for your students. The Clipboard Overview article details the features in the Clipboard.
Toolbar Tabs
The Editor toolbar contains six tabs.

- SYLLABUS: This tab allows you to add, edit, and adjust course content.
- The Standards/Badge panel, found within the SYLLABUS tab on the left, identifies the standards and badges associated with folders/activities. This panel can be expanded or collapsed.
- Folders and activities are found within the SYLLABUS tab.
- PROJECTS: This tab allows you to build robust student-guided projects.
- WEIGHTS: This tab allows you to define and manage grade weights for activities and categories.
- ACTIVITY LIST: This tab allows you to review your course structure and preview activities. Activities and folders can be filtered by title, type, and location.
- SCHEDULING: This tab allows you to schedule, create, and adjust due dates and plans for your courses.
- GROUP SETTINGS: This tab allows you to manage existing groups.
ADDITIONAL RESOURCES
You can customize and build your course using these Help Center articles:
| Buzz Editor: Adding Folders and Content | This article shows you how to add folders and content to your course. |
| Buzz Editor: Activity Types | This article describes the different activity types that can be added to your course. |
| Buzz Editor: Creating Assessments Job Aid | This article provides an overview for creating assessments within Buzz. |
Click here to return to the top of the article.
Please note, the images that may be found in this resource may not match your screen.
This is a Lincoln Learning Solutions product. Access/features may vary based on client contract.
© 2022 Lincoln Learning Solutions. All rights reserved.